Manually Managed Accounts and Assets
What are Manual Accounts?
Manual accounts, also known as advisor-maintained accounts, do not flow into Orion via a direct download source and are reflected within the Client Portal, Portfolio Audit, client reports, etc., similarly to custodial accounts, creating a complete view of a client's portfolio. All data for the account(s) must be manually input. It is best practice to regularly maintain the values and performance for these accounts to report on up-to-date figures and metrics.
How to Create and Maintain Manual Accounts
Update manual accounts at your discretion on a daily, weekly, monthly, quarterly, or periodic basis. The Transaction Add Import allows you to import transactions for multiple accounts with just one spreadsheet, making it convenient and easy to maintain.
Step 1 - Create New Account
The first step is to create a manual account to house the assets and transactions in the New Account Wizard tool inside the New Account Center app. The wizard allows you to create new advisor-maintained accounts either one-by-one or en masse through the Import New Accounts feature.
- Navigate to the New Accounts Center and select the New Accounts Wizard on the left sidebar to create a new manual account.
Please Note: Fields with red asterisks are required. Before finalizing the creation of the account, verify that all fields have been inputted correctly.
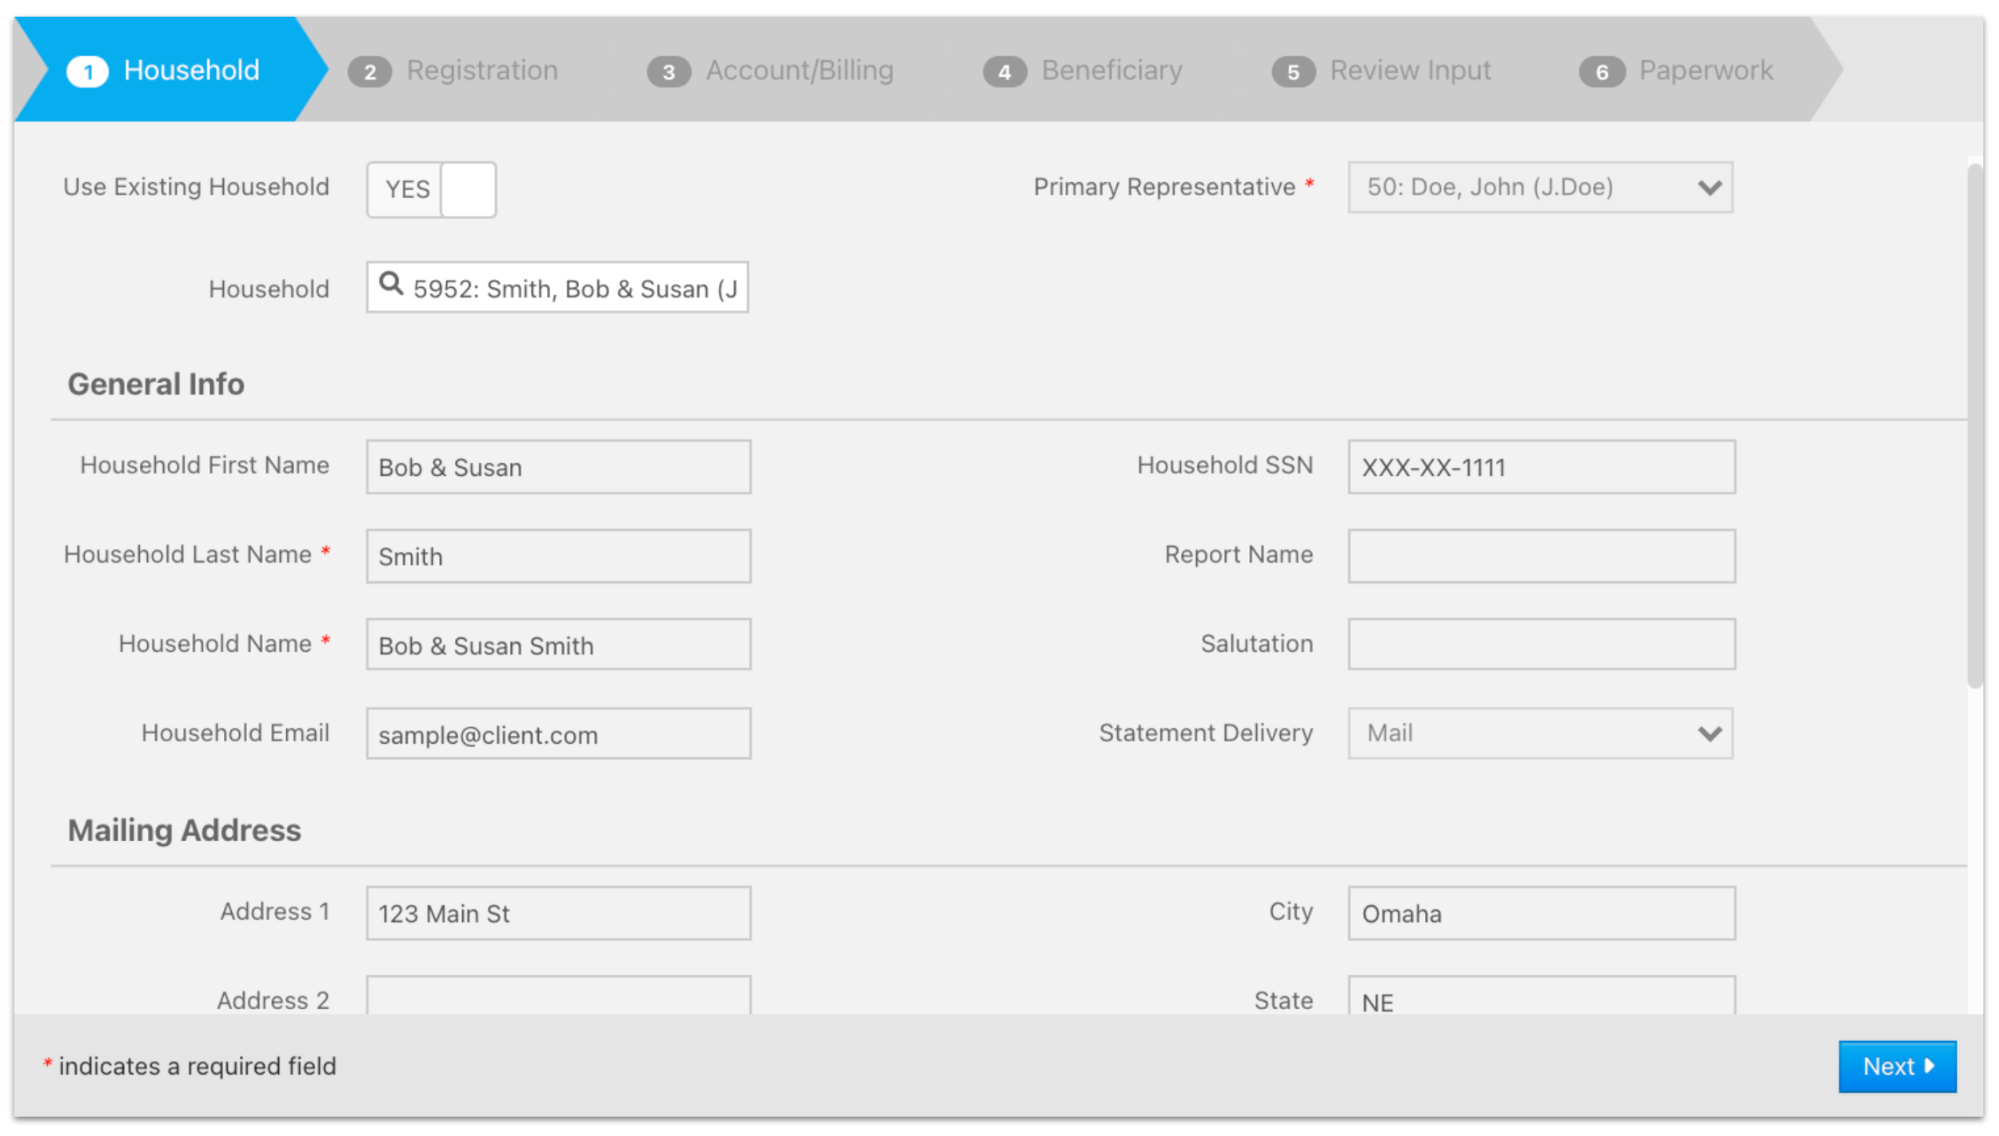
- Household step - Add the account to an existing household or create a new one. Then, click Next.
- Existing Household: If you want to house your account within an existing household, toggle Use Existing Household to Yes, and search for the Household ID or the household name. This populates the client's demographic information automatically.
- New Household: If selecting a new household, please fill out the requested information
- Registration step - Account Type is required. Complete any other necessary data points that are stored at the registration level such as Social Security Number, First/Last Name, and more. Click Next to proceed.
- Account/Billing step - Custodian, Fund Family, and Account Number are required fields. Complete any other necessary fields and then click Next.
- Custodian: 100% customizable and is driven by your firm. Custodians are used to group accounts, pricing hierarchy, make trading and cost basis decisions, and more.
- Example: Some firms use separate custodians for DST accounts to denote the financial institutions such as American Funds, Pacific Life variable annuities, etc. Some use a generic type such as Fund Direct.
- Create additional custodians in the Firm Profile app.
- Fund Families: Are not 100% customizable and are used for account groupings. Add or remove fund families in the Fund Family tab in the Firm Profile app.
- Account Number: This field is important and is used when adding the transactions to the account. This cannot be a duplicate of any existing account number.
- Beneficiary step - Optional. Enter your beneficiary information or click Next to skip this step. Please note that custodians do not send beneficiary information. You are able to add this information to accounts at a later date.
- Review Inputs - If you need to change any information, make the applicable updates before you create your account. If your inputs are accurate, click Submit to create the new account.
Support Contact: If you have any further questions about creating an account within the New Account Center app or importing accounts en masse, please contact the SME Platform Support team.
Step 2 - Create Custom Products
You can utilize an Alternative ticker product or email us at orion@xyinvestmentsolutions.com and ask us to create a new one for you.
Step 3 – Create New Assets
Next, create assets for the account either one-off in the Portfolio Audit App or en masse through the Transaction Add import.
- To create a single new asset, go to the Portfolio Audit app and click the Accounts tab.
- Filter for the manual account and then right-click on it to Edit Account.
- On the Account - General tab in the edit account screen, click the Actions dropdown in the top right corner and click New Asset.
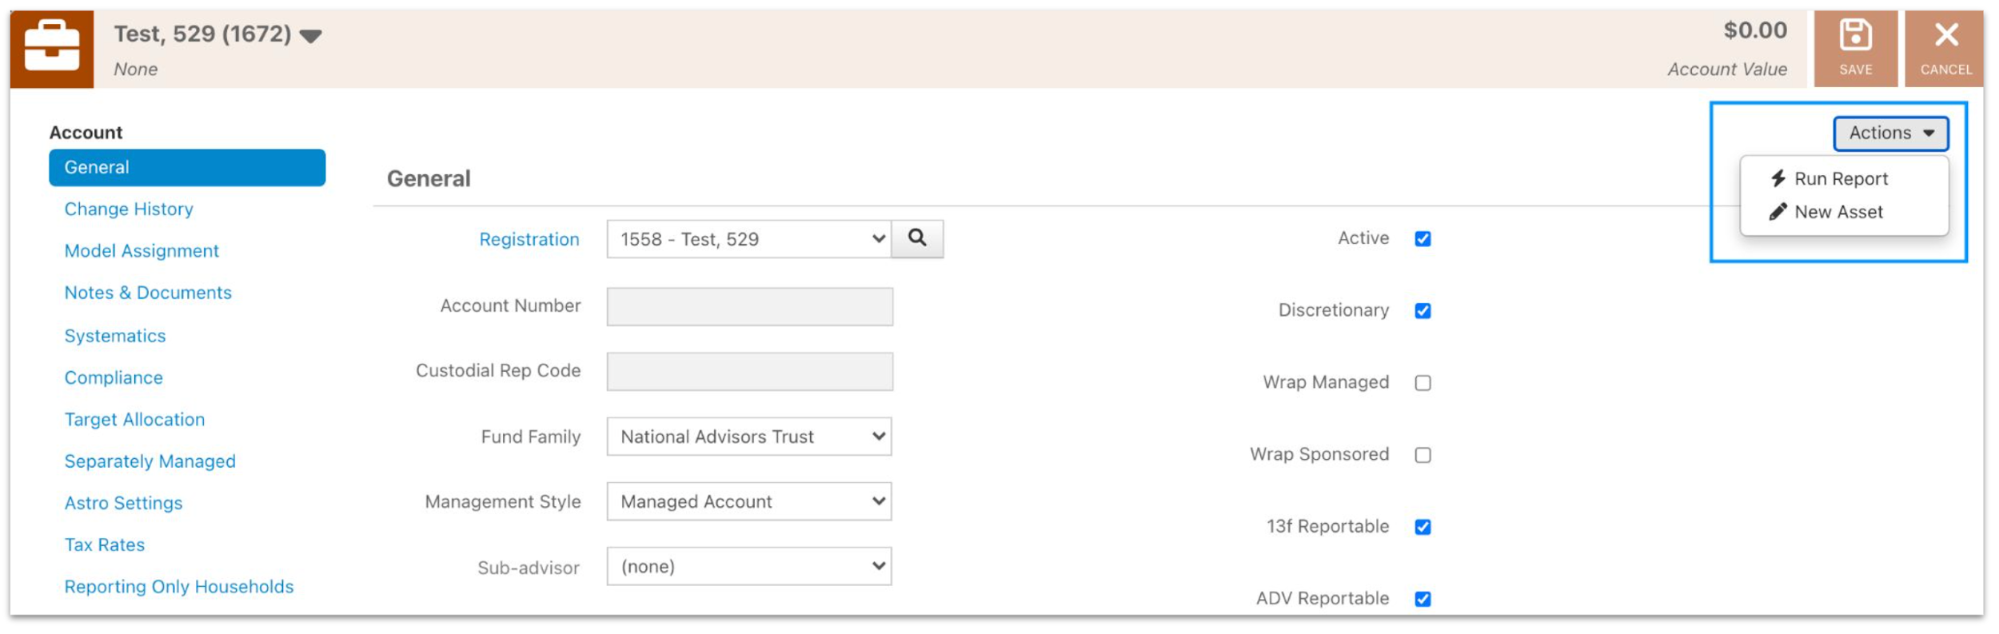
- The account name auto-populates in the Account field.
- Type the ticker, cusip, or product name to populate the associated product in the "**Product**" field. This is either a pre-existing product such as "Apple", or a manually created product from the previous step.
- Mark this asset's Status as "**Manually Managed**" and check the "**Manually Managed Advisor Only**" box. It is important that these settings are set to Manually Managed because this suppresses the asset from manual scrubs, auto-scrubs, the ACR, and from the core analysts so that they don't alter it for reconciliation purposes.
- The last important step is to input the corresponding Account Number that you assigned when you created the account. This ties the newly created asset to the specified account.
- Then click Save to populate the new asset within the account.

Step 4 – Create New Transactions
After the assets are created within the account, create transactions to input the account's value either one-off in the Portfolio Audit App or en masse through the Transaction Add Import. Adding transactions through the import also creates the assets within the account if there is not a matching ticker that currently exists within that account.
- To create a single transaction, navigate to Portfolio Audit
- Click the Assets tab and search for the applicable account
- Right-click on the asset you need to add transactions and select Edit Asset
- Click New Transaction in the upper right corner
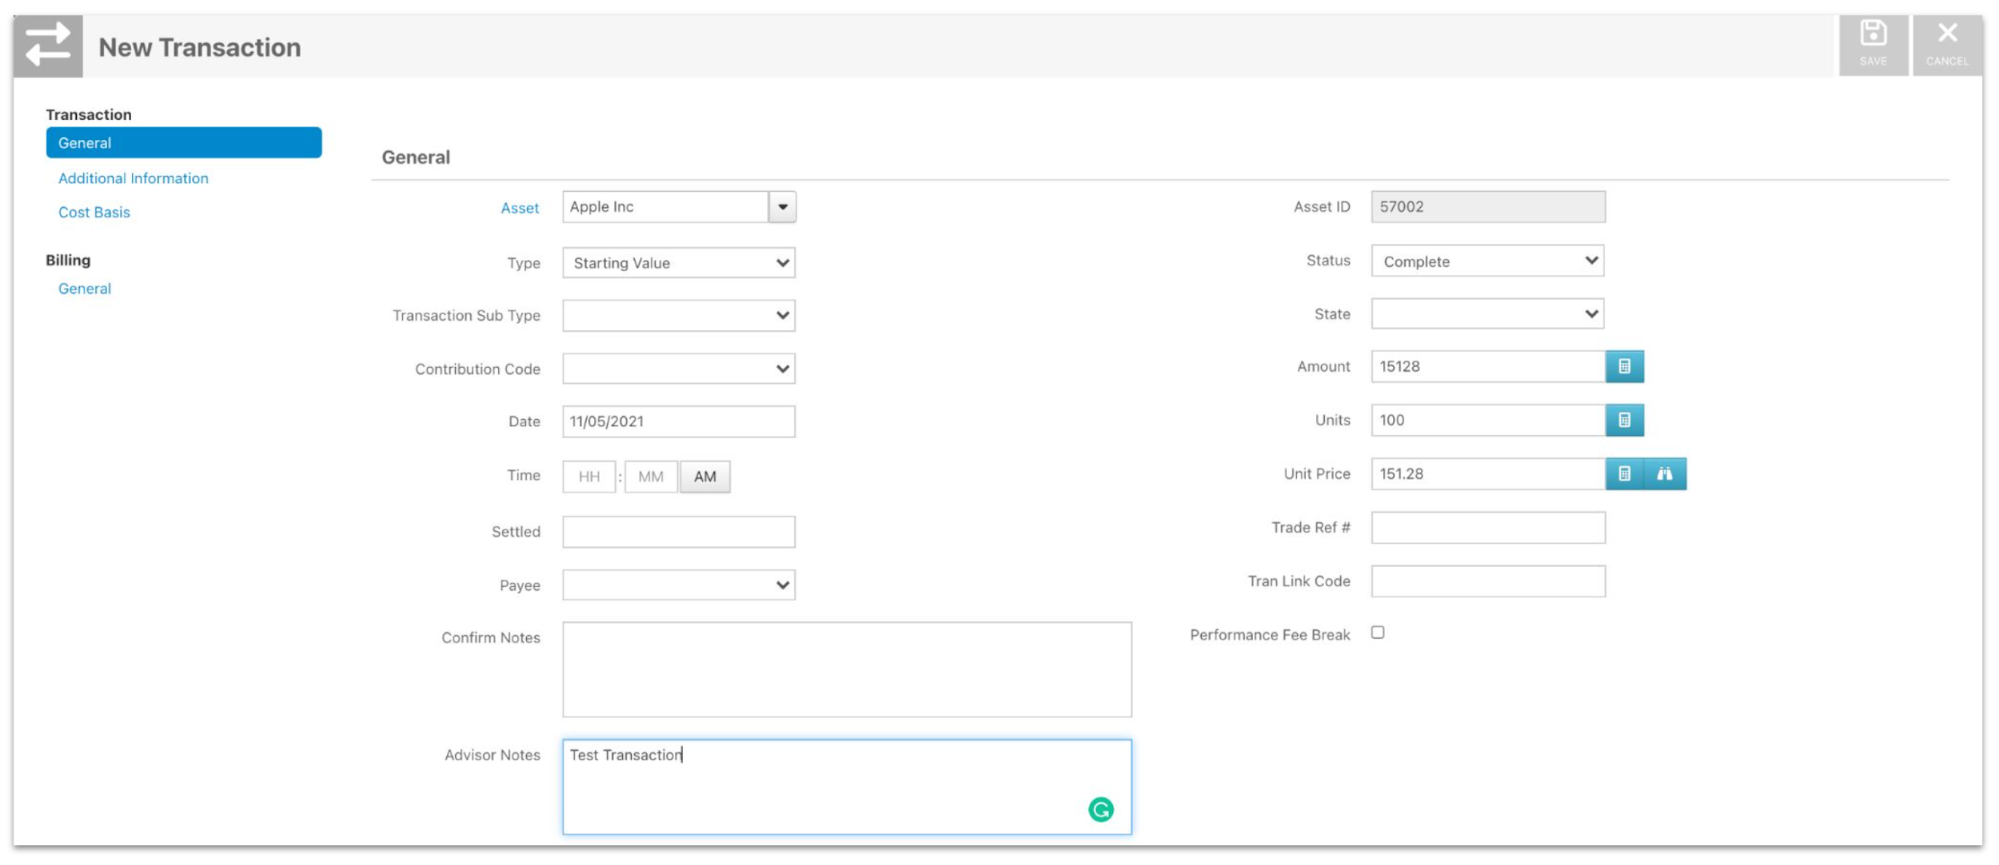
When creating a transaction, the following fields are required:
- Transaction Type: If you are adding a funding transaction within the account, the most common Types are Starting Value, Contribution, or Merge in from Other Account. If you are only tracking asset value and not full transaction history, use the "Increase/Decrease in Value" transaction type for future transactions depending on if your asset needs to go up or down in value.
- Date: This cannot be a future and must be an effective business date in the past.
- Unit Price: Use the binoculars to look up a price from the local/global price table and populate this price. Otherwise, enter the transaction price from your statement. If you are tracking asset value only, your Unit Price is $1.
- Units: This is the number of units that were purchased at the time of the trade. If you are tracking asset value only, the unit amount matches the Amount of your Increase/Decrease in Value.
- Amount: Unit Price multiplied by the Units equals Amount (Price x Units \= Amount). This is the total value amount for the transaction.
You may also add your Advisor Notes to the transaction. For example, "Journaled In from Account XXXXX456". After completing the necessary fields, click Save.